The fixing stage is the phase after lock-up when all internal fitout components are installed — architraves, skirting boards, doors, cabinetry, cornices, and internal linings — but before any painting or tiling begins. It is your last opportunity to inspect work that will be permanently hidden once the finishing trades move through.
If you miss a defect at fixing stage, you may not see it again until paint peels, a door refuses to close, or moisture shows up behind tiles years later. Getting on site at this point in the build sequence is not optional — it is one of the most important inspections you will do.
Where fixing stage sits in the build sequence
Most residential builds in Australia follow a standard progress payment schedule aligned with construction stages: slab, frame, lock-up, fixing, and practical completion (PC). Fixing stage comes immediately after lock-up, which is when the roof, external walls, windows, and external doors are in place and the home is weathertight. Free checklists are available for each of these stages:
- Slab Stage Inspection Checklist
- Frame Stage Inspection Checklist
- Lock-up Stage Inspection Checklist
- Practical Completion Inspection Checklist
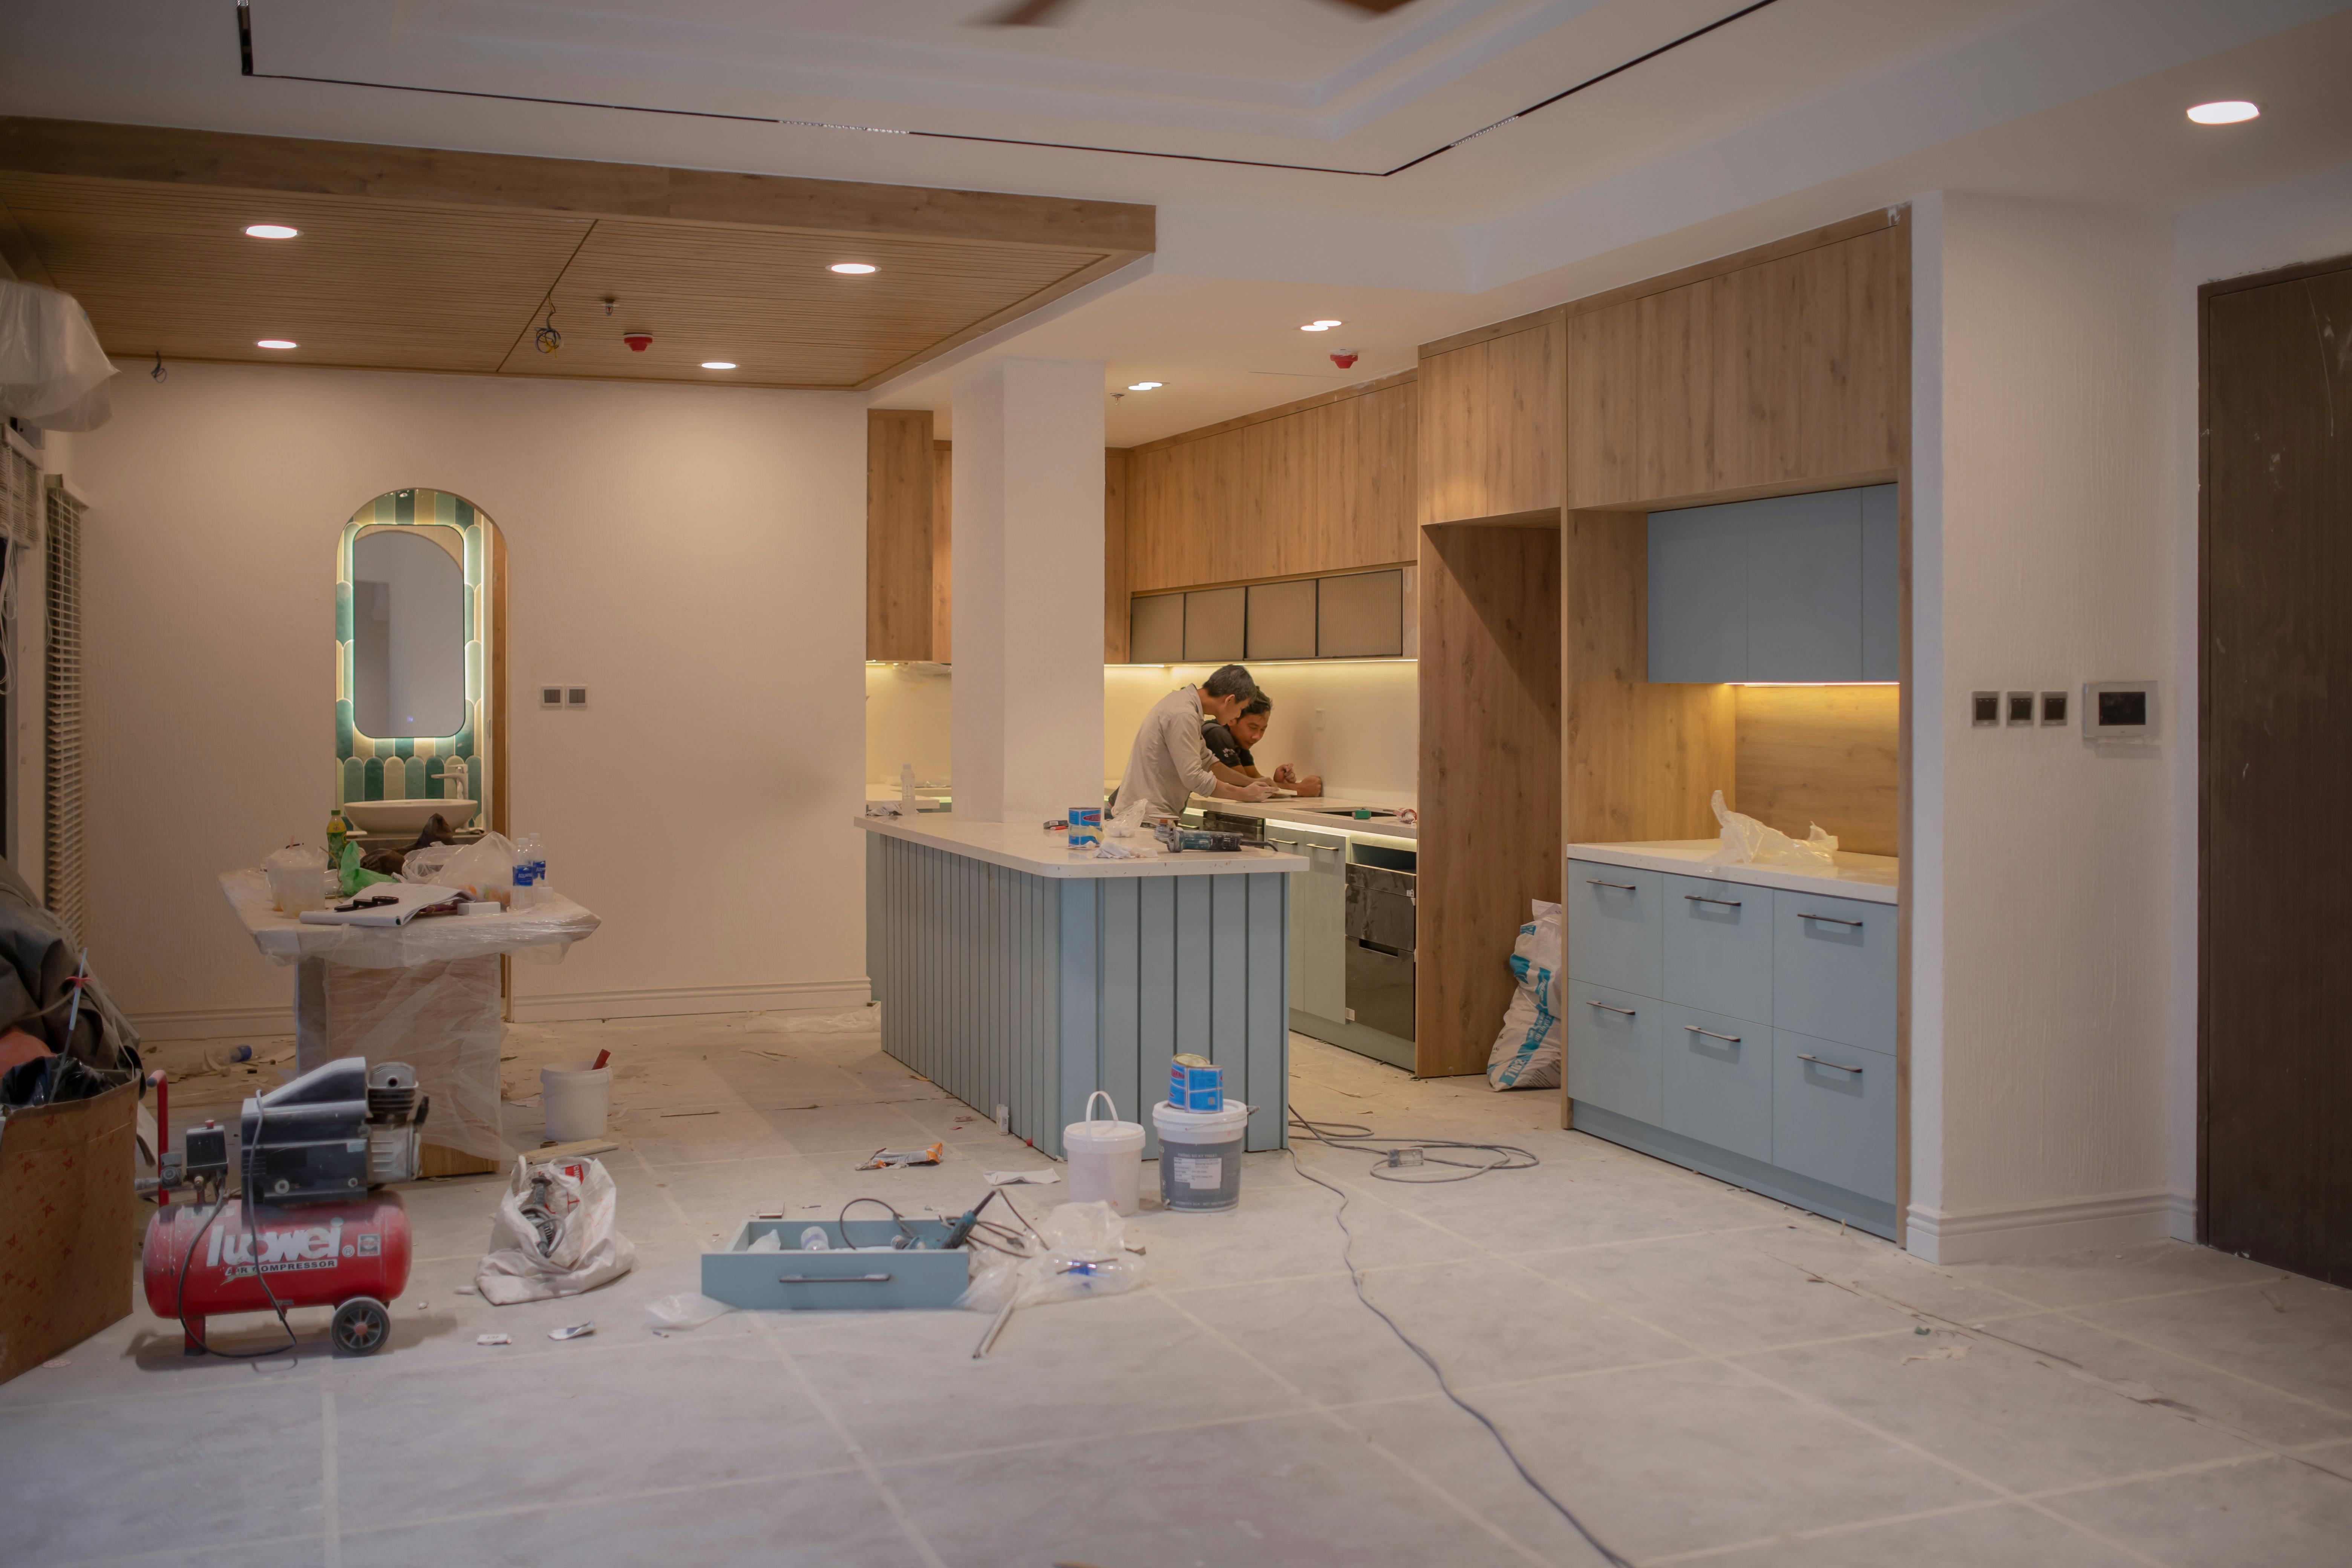
At fixing stage, internal trades have been through the home. Electricians have run cable to switch and power point locations, plumbers have installed pipe rough-ins to wet areas and fixture locations, and carpenters have fitted internal linings (plasterboard), door frames, skirting boards, architraves, cornices, and cabinetry. Stairs are built if applicable. Insulation is in the walls and ceiling. The home looks like a house on the inside, just without colour.
After fixing stage comes the finishing stage, where painters apply primer and topcoats, tilers complete wet areas, and fixture fitoff begins (tapware, light fittings, door hardware, appliances). Once paint goes on, every defect in the internal linings, cabinetry, and carpentry is either disguised or permanently hidden.
Why fixing stage matters more than most owners realise
The inspections most homeowners focus on are the frame stage inspection and practical completion. Frame inspections catch structural issues early. PC is the final walkthrough before keys are handed over. Fixing stage sits between these two milestones and is often underestimated.
This is the last stage where you can see:
- Rough-in plumbing pipe runs, including fall angles and pipe supports
- Electrical conduit, cable runs, and junction box locations
- Whether the waterproofing membrane has been applied to wet areas before tiling begins
- All structural members behind linings, including any frame damage from trades cutting or notching incorrectly
- Every internal lining panel, join, and corner before paint conceals surface imperfections
Under the National Construction Code (NCC), wet areas require a compliant waterproofing system before tiling. Once tiles go down, confirming compliance is impossible without destructive investigation. Fixing stage is your one chance to verify this has happened.
What to bring to your fixing stage inspection
Arrive prepared. A rushed walkthrough where you rely on memory is not enough at this stage.
- Smartphone or tablet with a defect logging app (or a dedicated camera)
- Torch — internal linings often have uneven surfaces that only show under raking light
- Spirit level — useful for checking door frames, skirting straightness, and cabinetry
- Pen and notepad as a backup
- A copy of your contract drawings and specification so you can confirm what was agreed versus what is installed
- Your builder’s site supervisor contact details for questions on the day
Walk through the home methodically, room by room. Do not skip rooms because they look fine at a glance — defects at fixing stage are often in joints, corners, and transitions between materials.
Doors and door frames
Check every door in the home, including cupboard doors and WC doors.
- Swing and clearance: Open and close each door fully. It should swing freely without binding on the frame, floor, or architrave. A minimum clearance of 5 mm under the door is standard for carpet; 10 mm for hard floors.
- Frame alignment: Check the door frame is plumb by eye and with your spirit level. A frame that is out of plumb will cause the door to swing open or closed on its own.
- Gap consistency: The gap around the door leaf (between the leaf and the frame) should be even — typically 2 to 3 mm on the hinge side, lock side, and top. Inconsistent gaps indicate poor fitting.
- Hardware location: Confirm latch barrels, strike plates, and hinges are correctly positioned. Hinges should be flush with the frame surface, not raised or recessed unevenly.
- Frame gaps: Check where the frame meets the wall lining. Gaps here are common and should be noted for the painter to fill, but large or uneven gaps may indicate a frame that has moved.
Windows and sliding doors
- Operation: Open and close every window and sliding door. Casement windows should open smoothly on their stays. Sliding doors should glide without resistance or derailment. Stiff operation at this stage will not improve.
- Seals and weatherstripping: Check that all compression seals are in place and undamaged. Missing seals allow air and moisture infiltration. Under the NCC, habitable rooms require windows that meet minimum energy efficiency requirements, and damaged seals affect performance.
- Hardware: Confirm all window locks, latches, and stays are installed and function correctly.
- Flyscreens: Check flyscreens are fitted where specified and that the mesh is undamaged.
- Sill drainage: On masonry construction, window sills should have a slight fall to the exterior. Check that weepholes in the frame or sill are open and unobstructed.
- Frame squareness: Check the reveal lining around windows is even. Tapered reveals are a sign the window was not installed square in the opening.
Skirting boards and architraves
Skirting boards and architraves are high-visibility items that are immediately obvious when poorly fitted, yet they are routinely defective at fixing stage.
- Mitre corners: Internal and external mitre joints should be tight with no visible gaps. Even a 1 mm gap at a corner will open further with timber movement once heating and cooling cycles begin.
- Wall contact: The back face of the skirting should sit flush against the wall lining. Gaps behind skirting boards are a sign the lining is not flat or the skirting was not back-cut to suit.
- Straightness: Stand at one end of each wall and sight along the skirting board. It should run in a consistent straight line. Bowing or dipping indicates the lining behind it is not flat.
- Fixing nails: Nails should be punched below the surface. Raised nail heads will be visible once painted. Check for split timber at nail locations.
- Joins along straight runs: Where skirting boards join along a long wall, the join should be a scarf joint (angled, not butt joint) and tight. Butt joins are poor practice and will open with movement.
Cornices and ceilings
- Cornice joins: Internal and external corners should be tight mitres. Gaps at cornice joins are common defects and should be noted.
- Straight runs: Sight along the cornice from corner to corner. It should follow the wall/ceiling junction in a straight, consistent line. Sagging or undulating sections indicate fixing issues.
- Missing sections: Confirm cornice has been installed throughout, including inside wardrobes and above built-in cabinetry if specified.
- Ceiling level: Use your torch in raking light across the ceiling. Lining ridges, nail pops, and sheeting joins that are not properly stopped will show up clearly. A ceiling that looks flat in normal light often reveals significant imperfections under raking light.
- Cracks: Fine hairline cracks at cornice joins are common and usually cosmetic. Wider cracks or cracks that run across ceiling sheets (not along joins) should be investigated, as they may indicate structural movement.
Internal linings (plasterboard)
The plasterboard inspection at fixing stage is critical because stopping (the process of filling joins and fastener heads) is done before painting, not before fixing. However, the underlying sheeting quality determines the final result.
- Surface flatness: Use your torch in raking light. Sheeting joins, set (stopped) areas, and nail/screw locations should blend into a flat surface. High or hollow points indicate the stopping has not been feathered properly.
- Moisture staining: Any brown or yellow staining on the sheets indicates water has entered. Find the source before it is painted over. Wet plasterboard loses structural integrity and can harbour mould.
- Holes and damage: Check for holes from trade access (plumbers and electricians cutting access), damaged corners, and broken sheets. All should be repaired before painting.
- Nail pops: Fastener heads that are raised above the surface will telegraph through paint. They should be re-driven and stopped.
Cabinetry
- Door and drawer alignment: Open and close every cabinet door and drawer. Doors should hang level, with even reveals at top and sides. Drawers should run smoothly on their runners.
- Hinges and soft-close mechanisms: Check hinges are fully tightened and that soft-close mechanisms operate consistently. Loose hinge screws in MDF pull out easily and are difficult to repair.
- Benchtop joins: Check that benchtop joins (at corners and between sections) are tight and level across the join. A lip between two benchtop sections will catch crumbs and moisture.
- Cabinet body squareness: Sight across the face of a run of cabinetry. The faces should form a consistent flat plane. Cabinets that sit proud or behind the run indicate the wall is out of plumb or the cabinets were not shimmed correctly.
- Kickboard fitting: Kickboards should sit flush with the cabinet face and follow the floor line consistently.
Rough-in plumbing and electrical
You are not a licensed plumber or electrician and cannot sign off on this work, but you can check for obvious anomalies that are worth raising with your builder.
- Pipe runs: Look at any visible pipe work in wet areas (under sinks, at the laundry, in the roof space if accessible). Pipes should be supported at regular intervals and run with a consistent fall where drainage is involved. Pipes resting on framing or each other without support are a concern.
- Penetrations: Where pipes pass through wall frames or flooring, the penetration should be sealed. Unsealed penetrations allow vermin access and can affect the fire resistance of separating walls in attached dwellings.
- Electrical conduit and cable: Check that cables are not pinched by frames, linings, or cabinetry. Cables running through frames should pass through correctly located holes, not notches cut into the edge of the timber.
- Junction boxes: All junction boxes should be accessible (not buried in walls), correctly located, and covered.
- Isolation valves: Confirm isolation valves are installed for each fixture location (basin, toilet, dishwasher) and that they turn freely.
Wet area waterproofing
This is one of the most important checks at fixing stage and one of the most commonly missed by homeowners.
Under the NCC, wet areas (showers, baths, laundries) require a waterproofing membrane applied to walls and floors before tiling. The membrane must be applied by a licensed waterproofer in most states, and in Queensland the work must be carried out by a licensed contractor under QBCC licensing requirements.
At fixing stage, tiling has not yet occurred. You should be able to see the membrane (typically grey or red/pink depending on the product used) on shower recesses and bath surrounds. Confirm:
- The membrane is present on all shower floor and wall surfaces up to the required height (typically 1,800 mm on shower walls)
- The membrane is turned up at the floor-to-wall junction (the cove)
- There are no obvious missed areas, holidays, or mechanical damage to the membrane
- A waterproofing inspection certificate has been or will be obtained (ask your builder)
If you cannot see a membrane, or the builder cannot confirm it has been applied, do not allow tiling to proceed. Remediating failed waterproofing after tiles are in place is extremely costly and is one of the most common latent defect issues in new residential construction.
Stairs (if applicable)
If your home has an internal staircase, fixing stage is when the structure should be complete.
- Structural integrity: Test each tread by applying your full body weight. There should be no flex, bounce, or creaking. Movement in a stair structure indicates inadequate fixing or undersized members.
- Rise and run consistency: The NCC specifies requirements for stair rise and going (run). Inconsistent rise heights are a trip hazard and a code breach. Measure several treads to check consistency.
- Balustrade fixing: If the balustrade is installed at fixing stage, check that posts are rigidly fixed. Apply lateral pressure to each post — they should not move. The NCC requires balustrades to withstand specified loads.
- Nosing: Check tread nosings are consistent and secure. Loose nosings are a hazard.
Common defects found at fixing stage
Based on what experienced building inspectors and HIA-affiliated industry practitioners regularly report, the most frequently found defects at this stage are:
- Mitre joints in skirting boards and architraves that are open or not tight
- Doors that do not swing freely or have inconsistent frame gaps
- Plasterboard nail pops and surface flatness issues
- Missing or incomplete waterproofing membrane in wet areas
- Cabinetry doors out of alignment or soft-close mechanisms not operating
- Cornices with gaps at joins or sections that are not straight
- Sliding doors that stick, jump, or do not lock correctly
- Ceiling sheeting joins that will show through paint
How to document and report defects
A verbal report to your site supervisor on the day is the starting point, but it is not sufficient on its own. You need a written record.
- Photograph each defect clearly, including a wide shot showing the location in the room and a close-up showing the defect itself.
- Log each defect with a description, location, and the date you observed it.
- Provide your written defect list to your builder in writing (email creates a timestamp and a record).
- Ask for a written response confirming which items will be rectified and by when.
Under the Australian Consumer Law (ACL) and state-specific legislation, builders are required to carry out work in a proper and workmanlike manner. A documented defect list is evidence that you identified issues and gave the builder the opportunity to rectify before painting commenced.
Tip: Checka lets you log defects with photos and voice notes directly on site, then generate a formatted defect report you can email to your builder on the spot. No spreadsheets or handwritten notes required.
What happens after you submit your defect list
Your builder will review the list and their carpentry and fixing trades will return to site to rectify. Common rectification work at this stage includes re-hanging doors, re-fitting skirting corners, re-fixing cabinetry, and repairing plasterboard damage.
Once rectification is complete and you are satisfied with the outcome, the fixing stage progress payment is typically due under your contract. Do not make this payment until you have re-inspected rectified items and confirmed they are resolved.
Any items that your builder disputes, or that remain outstanding at the end of rectification, should be noted in writing. Outstanding items carry over to practical completion, and a well-maintained defect log from fixing stage makes the PC inspection considerably more straightforward.
If your builder refuses to rectify legitimate defects, or if you are in dispute about whether a defect exists, you have options. In Queensland, the QBCC handles building disputes and can inspect disputed work. In New South Wales, NSW Fair Trading and NCAT provide dispute resolution pathways. Victorian homeowners can access the DBDRV (Domestic Building Dispute Resolution Victoria) before escalating to VCAT. South Australian homeowners can access the SACAT, and Western Australian homeowners can use the SAT (State Administrative Tribunal) for building disputes.
Key takeaways
- The fixing stage is the last point in the build where rough-in plumbing, electrical, and structural components behind linings are visible — inspect before painting begins.
- Wet area waterproofing must be confirmed at fixing stage; once tiling is down, verification is destructive and remediation is expensive.
- Check every door, window, skirting board, architrave, and cornice systematically, room by room, using a torch in raking light to reveal surface defects.
- Photograph and document every defect in writing and provide a formal list to your builder before approving the fixing stage progress payment.
- Open mitre joints, misaligned cabinet doors, inconsistent door clearances, and plasterboard nail pops are the most commonly found defects at this stage.
- Outstanding items from fixing stage carry forward to practical completion, so maintaining a clear written record from this point protects your position at handover.
Free to download
Stop losing track of defects.
Checka helps you capture issues, stay organised, and arrive at handover with a complete record of your build.